Update on the Shuttle Haswell systems

August 31, 2013

First off, the Shuttle XQ87, Shuttle has decided not to make the XQ87 model.  I wasn’t told why they are not going to
make this model.  I’ll see if they have something else in mind for the Mini-PC series.

The SH87R6 model is available now at a price of $249.99 US dollars.

The release date on the SZ87R6 will be sometime in October for $339.99.

We have also partnered with GlobalShopex for shipping Internationally to 150 countries from our website.


Shuttle’s new Haswell systems

July 14, 2013

Shuttle is coming out with 3 new Intel Haswell systems, 1 – Mini-PC and 2 – Cubes.

Here are the Specs on the 3 new systems:

Mini-PC- 1.3 Liter

Shuttle XQ87

Intel Q87 platform
LGA 1150 Haswell 65W CPU
16GB Max DDR3 Memory
2.5″ HDD / Slim ODD bay
Intel VPRO/AMT Technology
Video output – HDMI & DVI-I
2-USB 2.0, 4-USB 3.0 ports
RS232/RS422/RS485
Dual GB Lan
HD Audio
VESA mount, Kensington lock support
90W power adapter

Cubes

Shuttle SH87R6 – Now Available for $249.99

Intel H87 platform
LGA 1150 Haswell 95W CPU
32GB Max DDR3 Memory (4-DIMMS)
Intel Turbo Memory supported
Video output – HDMI & DVI-I
Power eSATA
1 – PCI-E x16 (Gen 2.0)
1 – PCI-E x4 (Gen 2.0)
SATA 6G Support
GB LAN
4 – USB 3.0 Ports , 2 x Front, 2 Rear
Mobile Device Fast Charge Feature
7.1 ch HD audio
Integrated ICE Heat-pipe
300W 80 Plus Power Supply

Shuttle SZ87R6

Intel Z87
95W Intel LGA1150 CPU
32GB Max DDR3 Memory (4-DIMMS)
Intel Turbo Memory supported
Power ESATA
Dual Display – HDMI and DVI –I
Dual GB LAN
4 – USB 3.0, 2 x Front, 2 x Rear
1 – PCI-E x16 (Gen 2.0)
1 – PCI-E x4 (Gen 2.0)
Mobile Device Fast Charge Feature
1 – MSATA PCI-E x16 (Gen 2.0)
1 – MSATA PCI-E x4 (Gen 2.0)
Overclocking
Integrated ICE Heat-pipe
7.1 ch HD Audio
500W 80 Plus Power Supply

None of these are available as of today, but stay tuned I will let you know when the release dates are.


Shuttle XH61V – After BIOS update, computer won’t boot

March 29, 2013

If you’ve updated the BIOS and the computer won’t post/boot try to reset the BIOS.

Here is how to reset the BIOS on the XH61V:

1.)  Unplug the power cord

2.)  Remove the lithium battery from the MB

3.)  Hold in the power button for 30 seconds

Then put everything back together and boot up the computer, the new BIOS update will remain after the reset.

If your computer still doesn’t post after the reset, you can RMA the BIOS chip for a replacement with the newest BIOS.  To do this, you can go direct to Shuttle Tech Support or I would be glad to help out with the replacement.


How to clear the CMOS for my Shuttle Computer and where is the button?

February 16, 2013

If you are having problems booting the computer or computer won’t post, you can usually solve the problem by clearing the CMOS.

Here is how to clear the CMOS:

Answer A:  Clear CMOS button is usually located on the back of computer.  A tiny hole located on the top left or bottom right depending on the model.

Answer B:  Before clearing the CMOS,

1. remove the power cord first,

2. insert one end of paperclip into hole,

3. hold the paperclip pushed in for 30 seconds,

4. plug the power cord back in and restart the computer,

5. press “DEL” on your keyboard to enter BIOS Setting,

6. select “Load Optimized Default” or “Load Default”,

7. press F10 to save and exit, done.

Once the computer posts and boots properly, you might want to go back into the BIOS and configure settings.


MOUNTAIN LION 10.8 WORKING on SHUTTLE XPC SH67H3/7 Motherboard V1

August 23, 2012

These are instructions from one of our blog readers gatd, thanks man!

First update your BIOs to the latest version

In windows update your USB 3 Firmware and Drivers to the latest version

Download MultiBeast 4.6.1 and 5.0.2 and ShowAllFiles from www.tonymacx86.com and put on another USB stick

Download UniBeast Mountain Lion 1.5.3

Run and select your ML image (it takes a while so be patient)

Copy onto your USB stick

In BIOS set your USB stick as the First Drive

Format your HD as 1 partition GUID (select in Options)

Install ML ( I used a wired Mac keyboard and mouse in the rear  top USB 2 port)

Keep USB Stick in

On reboot Select Your HD (right arrow at screen after bios)

Fill out your details

Start Using ML

At this point I filled out all my mac details for iTunes, iCloud, FaceTime and Messages.

Then run Multibeast 5.0.2 ( Hold the ctrl Key on your Keyboard to open) and select the following:

 Drivers & Bootloaders / Drivers / Audio select  = Realtek ALC8xx /Without DSDT / ALC888 / V100302 Current ( my board has ALC888)

Miscellaneous / = FakeSMC and NullCPUPowerManagement and USB 3.0 -3rd Party

Network / = Lnx2Mac’s RealtekRTL81xx

Customizations /System Definitions = Mac mini (I am using a i3 with HD3000 built in Graphics)

/Themes  = tonymacx86

Bootloaders / = Chimera v1.11 r1394

Run “showallfiles” and go to the Extra folder on your HD and open the org.chameleon.Boot.plist (it is invisible)

Replace contents with:

<?xml version=”1.0″ encoding=”UTF-8″?>

<!DOCTYPE plist PUBLIC “-//Apple//DTD PLIST 1.0//EN” “http://www.apple.com/DTDs/PropertyList-1.0.dtd”&gt;

<plist version=”1.0″>

<dict>

<key>EthernetBuiltIn</key>

<string>Yes</string>

<key>GraphicsEnabler</key>

<string>Yes</string>

<key>Kernel</key>

<string>mach_kernel</string>

<key>Kernel Flags</key>

<string>npci=0x3000 darkwake=0</string>

<key>Legacy Logo</key>

<string>Yes</string>

<key>Graphics Mode</key>

<string>1920x1080x32</string>

<key>Timeout</key>

<string>2</string>

</dict>

</plist>

SAVE

(the 1920x1080x32 part is for my TVs resolution and the Graphics enabler is for the built in graphics HD3000)

Open MultiBeast 4.6.1 ( Hold the ctrl Key on your Keyboard to open) and select System Utilities and continue then Install .

REBOOT

For bluetooth I am using a Belkin mini USB dongle F8T016NG and everything works great, including wake from sleep.

hope this helps someone


How to update the BIOS w/DOS for the SH67H3 V2 Ivy Bridge

August 9, 2012

I’ve noticed that some people are having problems updating the BIOS on the SH67H3 V2 model, so here are some instructions that should help.

Create a DOS bootable Flash drive:

You are going to need the HP USB Disk Storage Format Tool:
http://files.extremeoverclocking.com/file.php?f=197
(NOTE: click “PRIMARY DOWNLOAD SITE” to download this utility.)

You will need Windows 98 System Files to be able to boot in DOS:
http://files.extremeoverclocking.com/file.php?f=196
(NOTE: click “PRIMARY DOWNLOAD SITE” to download this folder.)

Be sure to extract all the Win 98 boot files.

Insert your flash drive and open HP USB utility (should automatically detect the flash drive)

Under “Format Options” select:

1.  Quick Format
2.  Create a DOS start up disk
click the radio button to select “using DOS system files located at”
browse to the folder with the extracted Win 98 boot files

Then click “Start”

Once the format is complete, download the latest BIOS update from here http://global.shuttle.com/products/productsDownload?productId=1477&osId=7

Extract the folder and open the DOS folder

Copy those files to the bootable flash drive you just made.

Now, start the computer and enter the BIOS to change your first boot device to the Flash drive.

It should now boot to a DOS prompt.

At the C:\

Type: flash

This should automatically flash the bios.

The system should be rebooted, enter the BIOS again to change the first boot device back to your hard drive.  Check all the settings in the new BIOS, ie date and time, etc.

If you have any questions, post it in the comments and I’ll be happy to help.

Hope this helps.


Internal Mini PCIe WiFi card for the XH61V & SH67H3 models

July 31, 2012

Shuttle has tested and recommends these 3 Mini PCIe WiFi cards for the SX79R5, SZ68R5, SH61R4, SH67H3, SA76R4 and the XH61V models:

1.  Intel Centrino Advanced-N 6235  WiFi and Bluetooth

2.  Intel Centrion Advanced-N 6230  WiFi and Bluetooth

3.  Realtek RTL8191SE  WiFi only

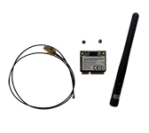
Mini PCIe Internal WiFi card kit

These were all tested with Windows 7 only.     We will have to test compatibility with Mac Lion, Mountain Lion.
If anyone knows if drivers for these cards are available for Lion and Mountain Lion, please let us know in a comment.


Ivy Bridge Support on the Shuttle SH67H3

April 20, 2012

Shuttle just released a BIOS update for Ivy Bridge support, but, only for the Version 2 motherboards.

Here is a link on how to identify your motherboard version.

Here is a link to the BIOS update version 201.

Unfortunately,  I have a “version 1” motherboard in my H3, so no Ivy Bridge upgrade on this one.

I’m checking with Shuttle to see if we can get the “Version 2” motherboard to upgrade the existing SH67H3 with the “Version 1” boards.  I’ll let you know what I find out, if anyone would like to go that route.

So, for those that have to have the latest and greatest Intel processors, this is definitely an update you want.

Just a quick reminder on how to update the BIOS on the SH67H3:

When you download the BIOS there are three folders.  The W32 and W64 folders have BIOS files as EXE and a DOS folder that has the BIOS as a ROM file that you would use with AFUWIN utility.

The EASIEST way in Windows:

Open the W32 or W64 (depending on your OS architecture) folder, right click the .EXE file and click “Run as Administrator”, if you don’t “Run as Administrator” you will get an error stating it “Can’t update the BIOS”.

It flashes the BIOS and reboots your computer and its done.


Update on the Audio for SH67H3

April 6, 2012

Without a DSDT for this board, I finally got the Audio to work using VoodooHDA 2.7.2 and I installed the modified AppleHDA.kext 2.13.

I have restarted this 5 times now and no KPs have occurred.

I tried using the VoodooHDA 2.7.3 and got a panic everytime, even with the modified AppleHDA.kext 2.13 or the AppleHDA Rollback, that some people have said stopped the KPs on the H3/7.


Shuttle XH61 Lion

March 21, 2012

Image

I built another XH61 for Lion testing, used the i3-2125 with the HD 3000 graphics.  I installed 8GB of memory and used a Seagate 500GB HDD.

I created the UniBeast USB installation drive per the instructions here.

Creating the USB drive and the Lion install went smoothly, this was a fresh installation.

Downloaded MultiBeast 4.3.0 and Chimera 1.80 standalone and copied to another USB drive.
First choices in MultiBeast are:  “EasyBeast” and then under “System Definitions”, chose the “Mac Mini”.

EasyBeast will include the bootloader Chimera 1.80 to enable booting from the hard drive, plus the rest of the files needed.

The “Mac Mini” option will enable the ports for the HD 3000 graphics, so you can use the VGA or HDMI ports.

Here is where the 1st problem starts, when booting from the hard drive, I got the “boot0 error” and why I downloaded the Chimera 1.80 standalone.  To fix the boot0 error, I had to copy the “boot1h” file from the standalone Chimera to a USB drive.  Here is the link with the instructions on how to do the rest of this.

When you install EasyBeast which includes the code to enable the graphics.  “GraphicsEnabler=Yes”.  So when you boot from the hard drive you will have to disable the graphics enabler.  On the “boot” line type in “GraphicsEnabler=No”.
Once it has booted up, go to /Extra and edit the “64-bit org.Chameleon.boot.plist” file.  Find the line that reads GraphicsEnabler, the 2nd line “Yes” and change it to “No”, then close the file.

Once you do this, it will boot from the hard drive, then you can open MultiBeast again and install the Lan driver.  I used the LnxMac Lan driver.  This worked fine.

The next driver I installed was for the Audio.  I tried the Realtek ALC8xx with the ALC8xxHDA, AppleHDA Rollback and Non-DSDT HDA Enabler.  Under the Non-DSDT HDA Enabler, I checked the ALC887/888b option.  Make sure that is the only one checked.  This driver did not work, “No Devices Found” in the “Sound and Midi” setup.  It does show correctly in the System Info.  There must be something that I just haven’t found yet, that is blocking the sound.  I will keep working on it though.

I did try the VoodooHDA 0.2.7.3 driver but, it made the system unbootable.  I will try the older versions to see if I can get the sound working with it.

After I got everything fixed and working, I installed the 10.7.3 combo update.

So far, everything works except the Audio.